Capsizing while kayaking can be a nerve-wracking experience, but knowing how to execute a Kayak T-Rescue can turn it into a manageable situation. The T-rescue is a simple and effective technique that helps a capsized kayaker get back into their boat with the help of a buddy. This method involves forming a “T” shape with your kayaks, flipping the capsized boat, and working together to stabilize everything.
Learning the T-rescue is not only valuable for immediate safety on the water, but it also builds confidence and teamwork among paddlers. The technique includes specific roles for both the rescuer and the swimmer, each performing vital steps to ensure the process goes smoothly. By mastering the basic stages and incorporating some advanced skills, you’ll be prepared to handle various kayaking scenarios with ease.
For those just starting out, practicing in calm, controlled conditions can make a huge difference. As you get more comfortable, you’ll be better equipped to handle unexpected challenges during your kayaking adventures. Don’t be afraid to ask questions like, “What should I do as the swimmer?” or “How do I prepare for a T-rescue?” as these will guide your practice and improve your technique.
Key Takeaways
- The T-rescue helps a capsized kayaker re-enter their boat with assistance.
- Roles for both the rescuer and swimmer are crucial for a successful T-rescue.
- Practicing in a controlled environment builds confidence and skill.
T-Rescue Basics You Must Know
T-Rescue is an essential skill in kayaking, crucial for ensuring safety and assisting fellow kayakers in trouble. It involves working with a partner to right a capsized kayak.
What Is T-Rescue?
T-Rescue is a method used by kayakers to help a paddler who has capsized return to an upright position. The capsized paddler signals for help by hitting their boat. The rescuer then positions their kayak perpendicular to form a “T” shape with the capsized boat.
Next, the rescuer aids in pulling the capsized kayak onto their deck. This process helps to drain water from the cockpit. Afterward, the kayaks are flipped to restore the capsized kayak to its upright position. This technique is vital for quick and efficient rescues in both calm and rough water conditions.
Importance in Kayaking Safety
T-Rescue is important for ensuring the safety of all kayak participants. During a capsizing event, the paddler might become disoriented or exhausted. Quick assistance minimizes the risk of hypothermia and drowning. T-Rescue techniques also teach vital skills for self-rescue and buddy rescues.
Practicing T-Rescue regularly improves a kayaker’s ability to act swiftly and calmly in emergencies. It also builds confidence and teamwork among paddlers. Knowing T-Rescue can be lifesaving in various environments, from calm lakes to turbulent sea and whitewater conditions. This skill is a fundamental part of any kayaker’s safety training and first aid measures.
Preparation for T-Rescue

To safely and effectively perform a T-Rescue in kayaking, proper preparation is essential. This includes having the right equipment and ensuring that all safety measures are in place.
Equipment Checklist
When preparing for a T-Rescue, make sure to have the necessary equipment ready. First, check your kayak, ensuring that it is in good condition. Inspect the paddle for damage and that it’s suitable for the type of water you will be on.
Next, ensure that your cockpit and skirt are secure and functioning properly. This helps maintain waterproof integrity and ease of wet exit. A bilge pump is vital for removing water from your kayak after the rescue.
Additionally, verifying that all paddlers have well-fitted personal flotation devices (PFDs) is crucial. It’s also wise to carry a whistle for signaling and throw bags for potential towing needs. Lastly, bring a first aid kit in case of any injuries during the rescue process.
Pre-Rescue Safety Measures
Before performing a T-Rescue, make sure to go over safety protocols with your group. Ensure that all paddlers are aware of their roles during the rescue and practice these roles beforehand.
Communication is key—agree on clear signals for alerting others of a capsize and coordinating the rescue. Ensure paddlers can whack their boat to signal a wet exit.
Practice the rescue procedure in calm waters before heading out to more challenging conditions. This includes practicing the hip snap technique and ensuring everyone is comfortable with the steps involved in the T-Rescue. Lastly, always check the weather conditions and water temperature, and have an emergency plan in place.
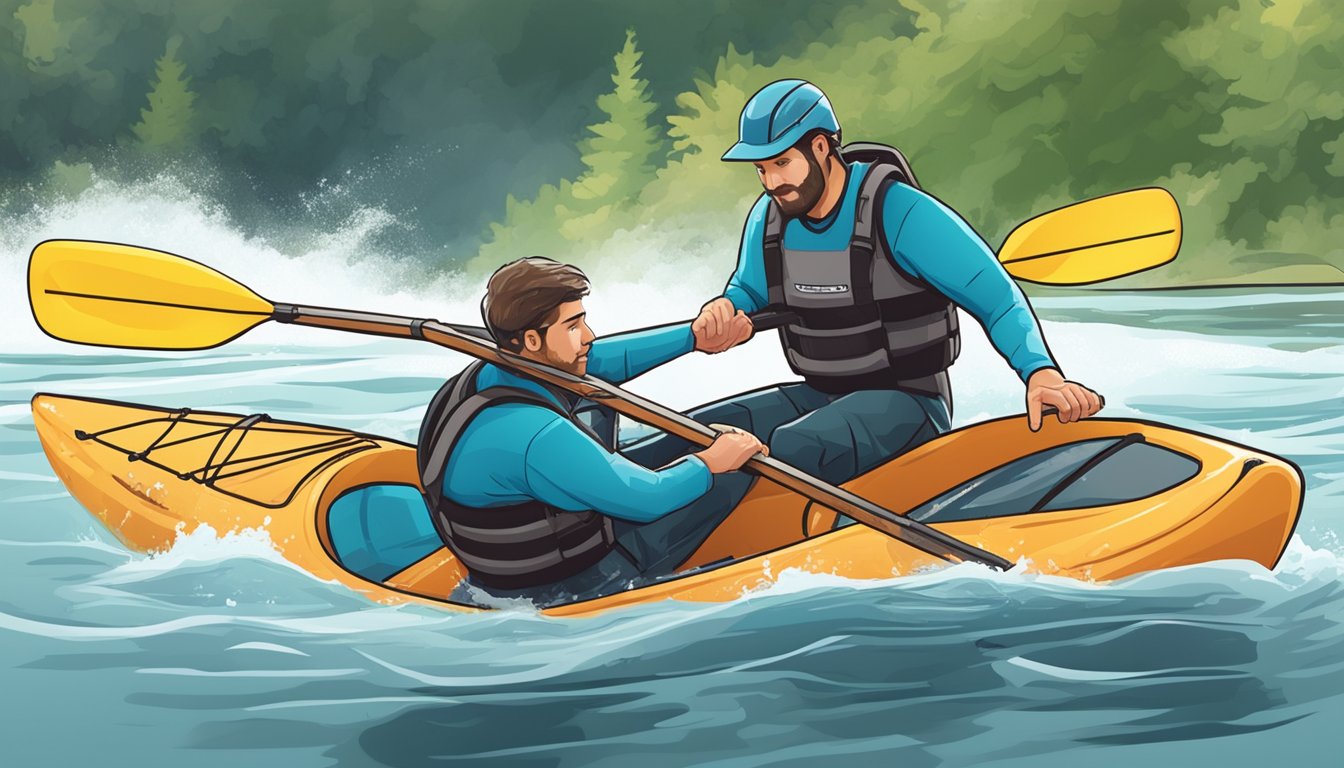
The Role of the Rescuer
The rescuer plays a crucial role in ensuring the safe and efficient execution of a kayak T-rescue. They must approach with precision, communicate effectively with the swimmer, and use proper physical techniques to stabilize and assist the overturned kayaker.
Approach and Positioning
The rescuer needs to approach the capsized kayak from the front, forming a “T” shape. This positioning allows them to stabilize their own boat and effectively assist the swimmer. It’s vital to maintain a perpendicular angle to minimize the risk of colliding with the swimmer’s boat.
Once in position, the rescuer should steady their kayak. They can use their paddle or their hands to keep their own kayak balanced while reaching out to assist the swimmer. Stability is key here to ensure both kayaks remain steady during the operation.
The rescuer must be mentally prepared to adjust their position as needed. Water conditions, such as currents or waves, might require some quick repositioning. Consistent and stable positioning makes the rescue process smoother and safer for everyone involved.
Communication with the Swimmer
Effective communication between the rescuer and the swimmer is critical. As soon as the rescuer approaches, they should make eye contact and use clear hand signals or verbal cues. This ensures that the swimmer knows what to expect and can follow directions easily.
The swimmer should inform the rescuer if they are injured or if there are other obstacles. This helps the rescuer plan the next steps and avoid any complications. Prompt and clear communication can make a significant difference in the speed and success of the rescue.
Additionally, it’s important to reassure the swimmer throughout the process. Simple phrases like “I’ve got you” or “Hold on tight” can help the swimmer remain calm, making the rescue more efficient.
Physical Techniques
The physical techniques the rescuer uses are crucial for a successful T-rescue. First, they must lift the bow of the swimmer’s kayak onto their own deck. This helps drain any water from the capsized kayak, making it easier to handle and more stable.
Next, the rescuer should roll the swimmer’s kayak upright. They can use their hands to flip it while keeping their kayak balanced. It’s important to perform this move smoothly to avoid creating more instability.
Once the kayak is upright, the rescuer will slide it back into the water. They must ensure that their own kayak stays steady throughout this process. Using their hands and maintaining good balance are key to completing the rescue smoothly and safely.
The Role of the Swimmer
The swimmer plays a key role in ensuring a successful T-rescue. They must communicate effectively and cooperate with the rescuer while following specific responsibilities to stabilize the situation.
Responsibility During Rescue
The swimmer needs to stay calm and in control during the rescue process. After a capsized boat, the swimmer performs a wet exit, making sure to hold onto their paddle and boat. They then alert the rescuer by tapping or whacking the boat.
Once the rescuer arrives, the swimmer assists by helping to position the kayak properly. By grabbing the cockpit coaming, they stabilize themselves and the boat. This helps the rescuer flip the boat back upright.
A paddle float can be used to aid reentry, providing extra stability. The swimmer should remain aware of their movements to avoid complicating the rescue operation.
Signals and Cooperation
Effective communication is critical for a smooth T-rescue. The swimmer must use clear signals to communicate needs and progress. For instance, tapping the boat signals the need for immediate assistance.
Once the rescuer aligns their boat perpendicularly, forming the “T,” the swimmer follows instructions precisely. Cooperation includes holding the bow of the rescuer’s kayak and pushing down as guided.
If instructed to perform a heel-hook reentry, the swimmer uses one leg to hook into the cockpit, making it easier to slide back in. Consistent cooperation ensures the rescue is effective and efficient, whether in calm or rough waters.
Stages of the Kayak T-Rescue
Performing a Kayak T-Rescue involves several important steps. This process includes responding to a capsize, making initial contact, righting the capsized kayak, and assisting the person back into their boat.
Capsizing Scenarios
Capsizing can happen unexpectedly. When a kayak flips over, the paddler may be trapped underwater until they exit the kayak. Common scenarios include rough water conditions, sudden weight shifts, or misjudged maneuvers. Whacking the kayaker’s boat during the wet exit can alert nearby rescuers, as suggested by REI. Quick reaction is crucial to ensure safety and prevent panic.
Initial Contact
Once the capsized boat is spotted, the rescuer paddles towards it, approaching the bow to form a “T” with their kayak. Clear communication between the swimmer and the rescuer is key. They should assess the situation and decide on the best method to begin the rescue. The swimmer holds onto both the paddle and the capsized boat, ready for the next steps in the rescue.
Righting the Capsized Kayak
The rescuer positions the capsized kayak on their deck, upside down. Together, they work to flip the kayak upright. This maneuver involves careful balance and coordination. The goal is to get the kayak to the surface without taking on more water. Techniques differ, but the crucial part is keeping a steady boat while lifting and flipping as described by Paddling Magazine.
Assisted Re-Entry
Once the kayak is upright, the swimmer needs to re-enter. They position themselves on the opposite side of the rescuer’s kayak, kicking strongly to lift themselves onto the deck. Grasping the rescuer’s kayak provides stability. They then slide into their own, ensuring they don’t flip again. The process, detailed by Paddling.com, requires patience and practice to perfect.
Solo and Buddy Rescue Techniques
Kayak T-Rescue techniques focus on self-rescue and assisted rescue methods to ensure paddlers can return to their kayaks safely after a capsize. Learning both approaches is essential for solo adventures and for providing help to others on the water.
Self-Rescue Variations
Self-rescue methods are essential for anyone kayaking alone. One common technique is the paddle float rescue. After a wet exit, the paddler reaches under the kayak to grab a paddle float. Attaching this float to one paddle blade creates an outrigger, providing stability. Hooking a leg inside the cockpit ensures the kayak stays close, and the paddler can then flip the kayak upright and use the float for re-entry.
Another method is the stirrup self-rescue. This involves securing a stirrup to the kayak’s bow and the paddle’s middle section. The paddler flips the kayak back to an upright position, places one foot in the stirrup, and then uses the stirrup to pull themselves back into the cockpit. Both techniques require practice and should be mastered before venturing out solo.
Executing a Buddy Rescue
Executing a buddy rescue requires strong teamwork and good communication. The T-Rescue is a popular technique where the rescuer paddles to form a T-shape with the capsized kayak. The swimmer holds onto the rescuer’s bow while the rescuer slides the swimmer’s kayak onto their deck. Together, they flip the capsized kayak upright.
Once upright, the swimmer holds the rescuer’s kayak for stability and performs a hip snap to roll back into their kayak. This method is efficient and works well in various conditions, whether paddling in calm seas or rough waters. It’s essential for paddlers to practice together to ensure smooth execution during real emergencies.
Mastering both self-rescue and buddy rescue techniques is crucial for any kayaker. Practice regularly to build confidence and skills on the water.
Advanced Kayak T-Rescue Skills
Advanced Kayak T-Rescue Skills focus on rolling techniques and high-risk scenario training to ensure paddlers are prepared for challenging environments. Improving these skills will enhance safety and efficiency during rescues.
Rolling Techniques
Advanced rolling techniques allow kayakers to recover from capsizes swiftly. Practicing the hip snap is essential. The hip snap is a powerful, quick movement that helps roll the kayak back upright. It involves using your hips and abdominal muscles while keeping the upper body relaxed.
Sea kayakers often practice the sweep roll. The sweep roll involves sweeping the paddle in a wide arc to provide support while rolling. This technique is effective in both calm and turbulent waters.
Whitewater kayakers might focus on the C-to-C roll. It starts with the paddle in the “setup” position near the kayak’s side, then sweeping it to the other side in a “C” motion to complete the roll.
High-Risk Scenario Training
Training for high-risk scenarios prepares kayakers for real-life emergencies. Practicing rescues in strong currents and waves helps simulate challenging conditions.
Kayakers should also work on buddy rescues where one paddler assists another. This involves forming a “T” with the boats and leveraging the rescuer’s boat to flip the capsized kayak upright. It’s crucial to get comfortable with communication and coordination during these exercises.
Additionally, understanding complex maneuvers like bow rescues and hand rescues can be beneficial. Bow rescues involve using the bow of the rescuer’s kayak to help the capsized paddler roll up. Hand rescues, on the other hand, involve a capsize recovery without a paddle.
Practicing in diverse conditions ensures readiness for various rescue needs.
Practical Tips and Techniques
Focus on improving technique and strength to master a kayak T-rescue. Minimize common mistakes to ensure a smoother and safer rescue. This section covers key tips and advice to enhance your abilities.
Efficient Movement and Strength
Strength in your arms and core is essential. When assisting a capsized kayak, it’s important to get into position quickly. Use powerful paddle strokes to reach the other kayak. Performing dry-land drills can also boost your paddling efficiency.
Position your kayak at a 90-degree angle to the capsized kayak to form a “T.” This makes it easier to flip the other kayak upright. Practice this maneuver often to make it second nature. Frequent practice builds muscle memory and confidence.
Grip strength is also crucial. A firm grip helps you stabilize both kayaks during the rescue. Practicing grip exercises off the water can help improve this. Efficient movement combined with strength makes the T-rescue quicker and safer.
Avoiding Common Mistakes
One common mistake is not communicating effectively. Always let your buddy know your intentions and actions. Whacking the capsized kayak signals your approach. Clear, loud communication is key.
Rushing the process can lead to errors. Take your time to secure both kayaks properly. Avoid jerking movements, as these can destabilize the rescue. Smooth, controlled actions are more effective.
Another mistake is improper positioning. Always aim to form a perfect “T.” Incorrect angles can make the rescue harder and more dangerous. Regular practice ensures accurate positioning becomes a habit.
Lastly, don’t forget to secure any loose items beforehand. Items like paddles or water bottles can get in the way and complicate the rescue. Prepare in advance to avoid such distractions.
Safety and Rescue Training
Proper safety and rescue training is essential for kayakers, especially those venturing into challenging waters. Key components include structured courses and hands-on practice scenarios.
Courses and Certifications
Taking a structured course is the best way to learn kayaking safety and rescue techniques. Many organizations, like the American Canoe Association (ACA), offer certifications that cover crucial skills. These courses include everything from basic safety practices to advanced maneuvers, ensuring you are well-prepared for any situation.
At places like the REI Store, you can find courses that focus on essential skills like the T-rescue. It’s important to choose a course taught by certified instructors who can provide hands-on training and personalized feedback.
Regularly updating your skills through refresher courses is also recommended. This ensures you stay current with the latest techniques and safety protocols.
Practice Scenarios
Practical application of rescue skills is crucial. It’s beneficial to simulate real-life scenarios, like capsizing and performing a T-rescue, in controlled environments. Practicing these scenarios helps build muscle memory and instills confidence in dealing with emergencies.
Visiting a nearby lake or calm river to practice is ideal. For instance, use the tips from Paddling Magazine to work on the T-rescue with a partner. Repeated practice in different conditions can prepare you for unexpected situations.
Ensure you have proper safety gear during practice sessions. Always wear a life jacket and possibly a helmet, especially in rough waters. Practicing in varied conditions helps you adapt to different challenges, making you a more proficient and safe kayaker.
Frequently Asked Questions
Kayak T-Rescue involves specific techniques used to assist and recover from capsizing. Here, we address common questions about the process, types of rescues, and related skills.
Q: How is a T-rescue performed in kayaking?
A: In a T-rescue, the rescuer paddles to the front of the capsized kayak, forming a “T” shape. The swimmer and rescuer work together to slide the swimmer’s boat onto the rescuer’s deck. They then flip and reorient the boat before assisting the swimmer back in.
Q: What are the different types of rescues you can use in sea kayaking?
A: Apart from the T-rescue, sea kayakers can use a heel hook rescue, paddle float rescue, and Eskimo rescue. Each method involves specific steps to ensure the kayaker can safely and efficiently re-enter their boat.
Q: What techniques are involved in a kayak capsize recovery?
A: Capsize recovery techniques include the T-rescue, the paddle float rescue, and the Eskimo roll. These skills involve coordination between the swimmer and rescuer, proper boat handling, and specific maneuvers to right the kayak and re-enter it.
Q: How does one execute a wet exit in a kayak?
A: To perform a wet exit, a kayaker capsizes and removes their spray skirt while underwater. They then push themselves out of the kayak and surface. This skill is crucial for safety and is often the first thing taught in beginner kayaking classes.
Q: What are the steps for performing a heel hook rescue in kayaking?
A: In a heel hook rescue, the swimmer hooks a leg over the rescuer’s kayak and uses a combination of pulling with their arms and pushing with their leg to slide back into their kayak. It requires practice but is effective for getting back into the boat quickly.
Q: Where can I find a kayak self-rescue class?
A: Kayak self-rescue classes are offered at many local paddling clubs, outdoor recreation stores (like REI), and through specialized instructors. These classes cover various rescue techniques and are essential for developing confidence and safety skills on the water.

7 thoughts on “Kayak T-Rescue: Mastering Essential Safety Techniques”